
搞事情,就是要搞事情!
[toc]
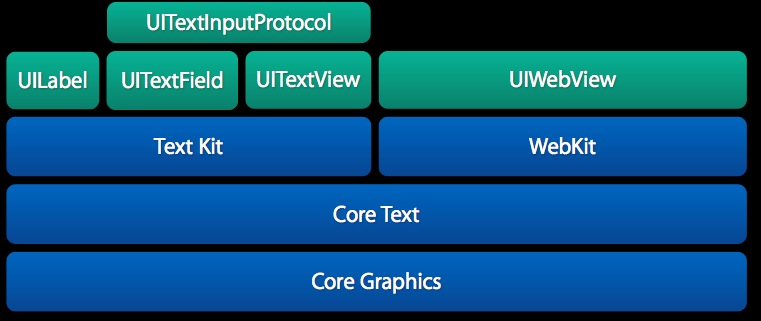
先搞清楚族谱
再搞清楚架构
- TextKit框架主要的几个View,主要包括
UILabel,UITextView,UITextField;- TextKit是NS一支的,所以不光只在iOS中使用;
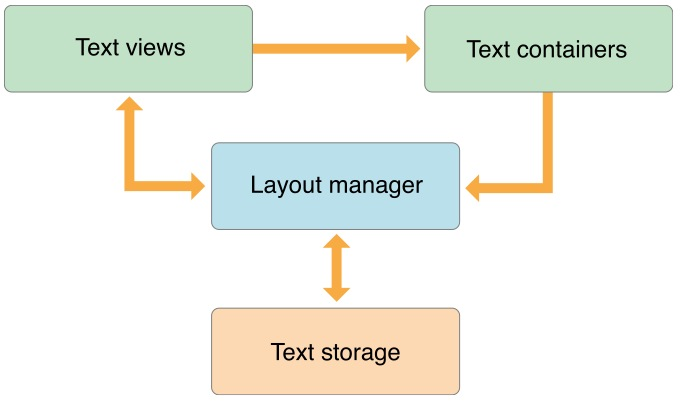
- Text container对应
NSTextContainer,它定义了文本排版区域,很明显,文字是在这个区域中被管理的;- Text storage对应
NSTextStorage,继承自NSMutableAttributedString,用于存储文本字形和相关属性;- Layout manager对应
NSLayoutManager,负责对文字进行编辑排版处理,在上面第4条中的类保存的数据可以通过本条中的类转换显示到视图中,其中这个单词字形(glyphs)需注意;
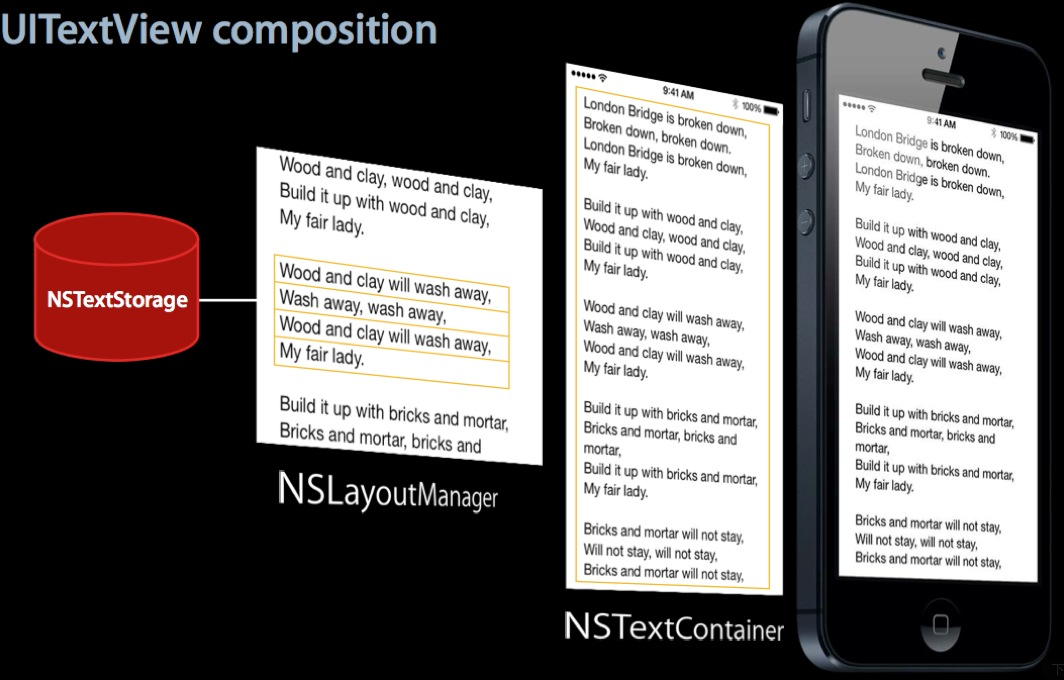
这张图很直观
我们来做点事情
首先我们需要一个自定义类型的UITextView,用它来对我们的文字内容进行自定义修改;1
2
3
4
5
6
7
8
9class ProblemView: UITextView {
override init(frame: CGRect, textContainer: NSTextContainer?) {
super.init(frame: frame, textContainer: textContainer)
}
required init?(coder aDecoder: NSCoder) {
fatalError("init(coder:) has not been implemented")
}
}
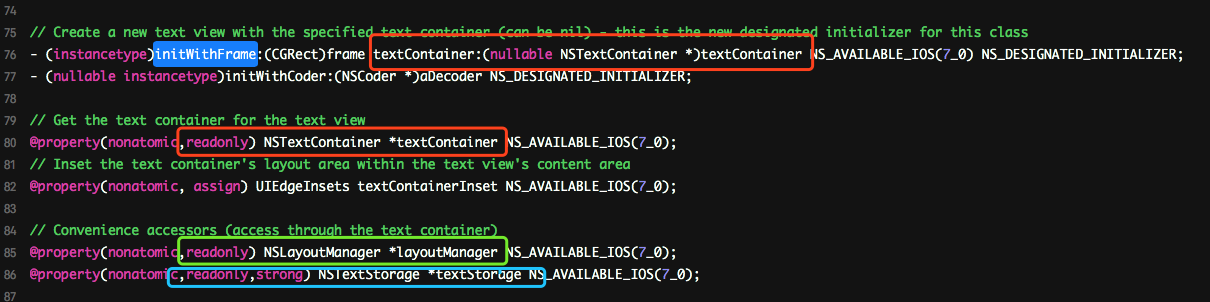
UITextView的初始化方法中有一个textContainer参数,很明显是我们上面提到的,且如图中三种颜色的框框所示,是我们上面提到的管理类,且全部为只读属性;
并且就上面的三种类之前的管理,如果我们要自己管理的话,应该也是一个树型的结构;
接下来我们要配合NSAttributedString添加显示强大的富文本;
NSAttributedString
1 | private(set) var attributedProblem: NSAttributedString = NSAttributedString.init() |
我们需要一个具有计算属性的变量,当我们在内部修改该变量时做一些操作;上面的代码解释几点:
- 我们需要在替换textview内容的时候重新计算内部空间,所以必须要在计算前将内容复制下来;上面代码第4行;
- 第7行中我们给出了一个示范,在这里可以修改与
NSTextContainer相关的属性; - 第8行我们开始进行文本替换,替换的内容为设置的新的富文本内容,范围则是该文本的
NSRange; - 接下来我们需要重新计算内部大小,这个内容大小就类似于
ScrollView的contentSize,计算的过程中我们要指定它的宽度,令高为最大值,结果会根据宽度计算出相应的文本需要高度;最后将size设置为textContainer的size,这里一定要注意; - 这里如果是
self.sizeToFit()方法,则textView的size会根据内容变大,而不是内部空间变大,这是与上面一条的区别;
那传一段文本进来吧
1 | //设置题目文字属性 |
如果你以前用过富文本,那这个方法看起来没什么,无非就是做了两件事:
- 生成一个富文本;(有关于富文本的内容,可以自行谷歌一车)
- 将文本设置到我们的textview里;
我想改变一段文字
如果我们想修改某一截文字的属性,那么我们只需要将保存的富文本取出,然后截取位置,替换掉原先的富文本,然后重新设置到属性中去,如下:1
2
3
4
5
6
7
8
9
10
11
12
13
14
15
16
17
18
19
20//当前要发生替换的区域
private(set) var optionsRange: NSRange?
//替换选项文字
func replaceOption(options: String, replaceOptions: String, font: UIFont) {
//给选项添加属性
let changeString = NSMutableAttributedString.init(attributedString: self.attributedProblem)
let optionString = self.textOptions(text: replaceOptions, font: font)
//选项最终位置
if let optionsRange = changeString.string.range(of: options) {
let range = NSRange(optionsRange, in: options)
changeString.replaceCharacters(in: range, with: optionString)
self.optionsRange = range
} else {
self.optionsRange = NSRange(location: 0, length: 0)
}
self.attributedProblem = changeString
}
当然我们要替换的文本当然也可以是富文本;1
2
3
4
5
6
7
8
9
10
11
12
13
14
15
16
17
18//上面的第8行中的方法
//给选项添加属性
func textOptions(text: String, font: UIFont) -> NSAttributedString {
//选项左右添加空格
let addSpace = " " + text + " "
//选项文字属性
let optionString = NSMutableAttributedString(string: addSpace)
let optionRange = NSRange(location: 2, length: text.count)
optionString.addAttribute(NSAttributedStringKey.font, value: font.withSize(20), range: optionRange)
optionString.addAttribute(NSAttributedStringKey.foregroundColor, value: UIColor.red, range: optionRange)
optionString.addAttribute(NSAttributedStringKey.strokeColor, value: UIColor.white, range: optionRange)
optionString.addAttribute(NSAttributedStringKey.strokeWidth, value: -3, range: optionRange)
optionString.addAttribute(NSAttributedStringKey.underlineStyle, value: 1, range: optionRange)
return optionString
}
这里需要注意的就是swift-Range与oc-NSRange的转换,关于swift的Range个人感觉比以前难用了,但是更加通用了吧,说下转换:
1 | if let optionsRange = changeString.string.range(of: options) { |
也许还可以替换图片
1 | //添加富文本图片 |
无他,仍然只是需要找到一个替换区域,替换成想要的可支持的富文本属性;
别人不会告诉你的事
最后想告诉你我们可以通过NSRange来得到所在区域的坐标,这是个无意中谷歌到的东西,如下:1
2
3let rect = self.problem.textContainer.layoutManager?.boundingRect(forGlyphRange: self.problem.optionsRange!,in: self.problem.textContainer)
self.problem.scrollRangeToVisible(self.problem.optionsRange!)
找到目标区域,并定位到该区域;